how to manually lock a garage door

Manually locking your garage door ensures security and safety, especially during power outages or system failures; It involves using mechanisms like the manual release cord and auxiliary locks to prevent unauthorized access and ensure stability. This method provides an additional layer of protection, making it harder for intruders to enter your garage. Proper alignment and engagement of the lock are crucial for effective security. By understanding the process, you can safeguard your property with confidence. Regular maintenance and inspection of locking mechanisms further enhance reliability and durability over time. Always ensure the door is in the correct position before securing it manually.

Importance of Manually Locking a Garage Door

Manually locking your garage door is essential for enhancing security and protecting your property from potential breaches. It provides an additional layer of protection against unauthorized access, especially when the automatic opener is disabled or during power outages. This step ensures your garage remains secure, deterring intruders and safeguarding stored valuables. Manual locking also offers peace of mind, knowing your property is physically secured. Regular use of manual locks can prevent accidental opening and ensure stability, making it a crucial practice for homeowners seeking to maintain a safe and secure environment. It’s a simple yet effective way to strengthen your home’s defense system.

Overview of Manual Locking Mechanisms

Manual locking mechanisms for garage doors are designed to provide an additional layer of security when the automatic opener is not in use. These systems typically include components like a manual release cord, which disengages the opener, and a locking bar or handle that secures the door in place. Some mechanisms may also involve auxiliary locks, such as padlocks or slide bolts, for extra protection. These systems are often simple to operate, requiring minimal effort to engage or release. They ensure the door remains stable and secure, preventing unauthorized access and potential breaches. Understanding these mechanisms is key to effective manual locking.

Key Components of a Garage Door Locking System

The key components include the manual release cord, locking bars, and auxiliary locks. These elements work together to ensure secure and stable door closure manually.

Understanding the Garage Door Opener

The garage door opener is an essential component that automates door operations. It typically includes a motorized unit with a belt or chain drive, controlling the door’s movement. When functioning, it ensures smooth opening and closing. However, during power outages or malfunctions, the opener disengages, requiring manual intervention. The system often features a manual release cord, which, when pulled, decouples the opener from the door, allowing manual control. This cord is usually a red rope with a handle, located near the door for easy access. Proper maintenance, such as adjusting tension and lubricating parts, keeps the opener reliable and functional. Regular checks ensure optimal performance and safety.

Manual Release Cord and Its Function

The manual release cord is a crucial component found on most garage door openers. Typically colored red for easy identification, it is located near the door on the opener rail. Its primary function is to allow manual operation of the garage door when the automatic opener is disconnected, such as during a power outage. By pulling the cord away from the door, you can disengage the opener mechanism, enabling you to open or close the door manually. This feature ensures that you can secure your garage when the opener is not functioning.

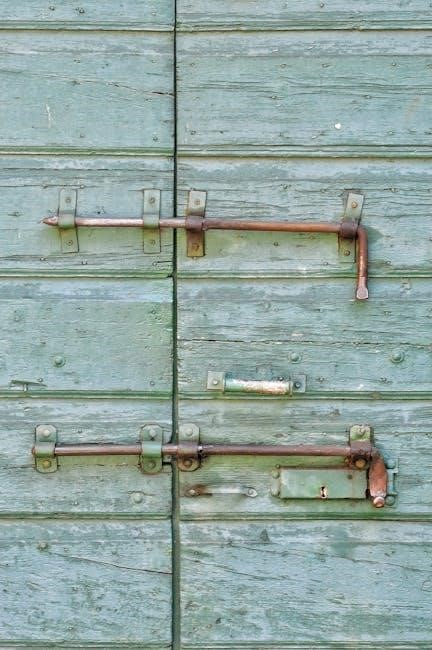
Types of Locking Mechanisms

Garage doors utilize various locking mechanisms to enhance security. Common types include the manual release cord, T-handle locks, slide locks, and padlocks. The manual release cord allows disengagement of the automatic opener, enabling manual control. T-handle locks provide a secure grip for locking and unlocking. Slide locks, often installed on the door tracks, prevent movement when engaged. Padlocks offer additional security by locking the door to the track. Each mechanism serves a unique purpose, ensuring flexibility and robust protection against unauthorized access. Understanding these options helps in selecting the most suitable locking system for your garage door needs.

Preparing to Manually Lock the Garage Door

Preparing to manually lock your garage door involves disconnecting the automatic opener, ensuring the door is fully closed, and locating the manual locking mechanism. This ensures smooth operation.

Disconnecting the Automatic Opener

To manually lock your garage door, start by disconnecting the automatic opener. This ensures the door operates independently of the motor. First, locate the manual release cord, typically a red rope with a handle, attached to the opener rail. Pull this cord firmly away from the door until you hear a distinct click, which disengages the opener. This action transfers control to the manual locking mechanism, allowing you to secure the door without relying on the automatic system. Always ensure the door is fully closed before proceeding to lock it manually.

Ensuring the Door is in the Correct Position

Before manually locking your garage door, ensure it is fully closed and properly aligned. A misaligned door can prevent the lock from engaging securely. Check the door’s position by verifying that all sections are evenly aligned and the bottom seal touches the floor. If necessary, use a level to confirm the door is straight. Ensure the area around the door is clear of obstacles. If the door is slightly ajar or uneven, adjust it gently to achieve the correct position. Proper alignment is essential for the locking mechanism to function effectively and provide maximum security.

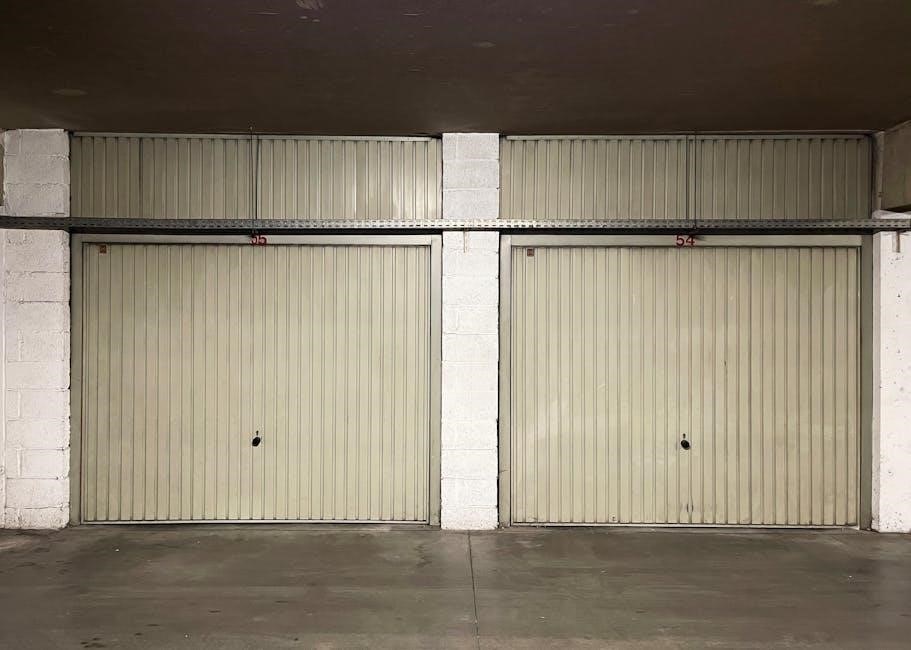
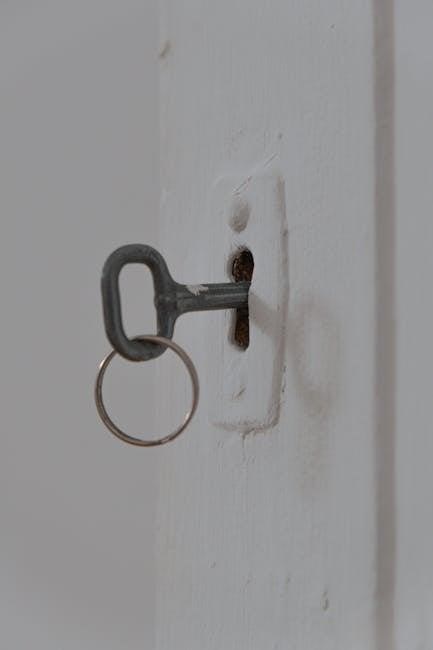
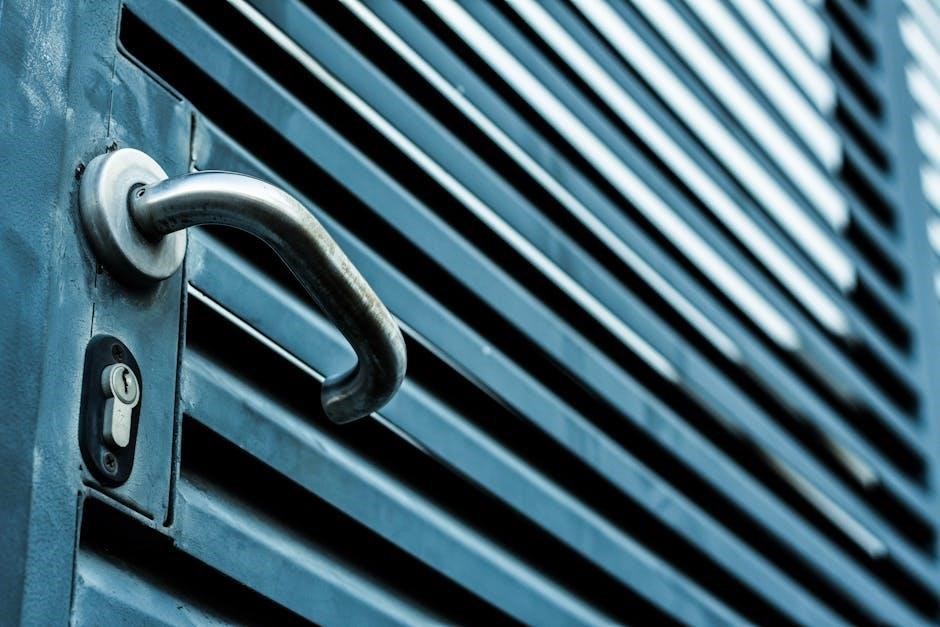
Locating the Manual Locking Mechanism

To manually lock your garage door, first locate the locking mechanism. It is typically found near the center of the door or along the bottom edge. Look for a metal handle, latch, or lever. Some doors feature a T-handle that aligns vertically when locked. Others may have a sliding bolt or a keyhole for a padlock. Ensure the mechanism is accessible and free from obstructions. If your door has an automatic opener, the manual lock may be located near the emergency release cord. Familiarize yourself with its position to secure your door efficiently when needed.

The Manual Locking Process

Engage the manual lock by aligning the door properly and securing it with the locking mechanism. Use auxiliary devices for added safety. Ensure stability and alignment.

Engaging the Manual Lock

To engage the manual lock, start by ensuring the garage door is properly aligned and in the fully closed position. Locate the manual release cord, typically a red handle, and pull it to disengage the automatic opener. Next, find the locking mechanism, which may be a T-handle or a sliding lock. Turn the handle counter-clockwise or slide the lock into place until you hear a distinct click. This indicates the lock is securely engaged. For added security, consider using auxiliary locking devices like padlocks or C-clamps on the door tracks. Always test the lock by gently pulling on the door to ensure it is stable and cannot be opened. Proper engagement ensures your garage remains secure.

Using Auxiliary Locking Devices

Auxiliary locking devices provide an additional layer of security for your garage door. Consider using padlocks on the door tracks near the wheels to prevent movement. C-clamps or vise grips can also be applied to the track, ensuring the door remains in place. For maximum security, position these devices approximately six inches above the floor to make it difficult for intruders to access the gap. These methods complement the primary locking mechanism, enhancing overall protection. Ensure the devices are tightly secured to maintain stability and prevent unauthorized entry. This extra step offers peace of mind, especially for high-security needs.

Securing the Door with Additional Measures

Beyond the primary locking mechanism, consider securing the garage door with extra measures. Use a straightened clothes hanger wire to hook the manual release cord and pull it down, ensuring it remains engaged. Alternatively, place a screwdriver or similar tool in the track above a roller to block movement. For added security, clamp the track with C-clamps or locking pliers, positioning them low enough to prevent the door from being forced open. These methods create additional barriers, making unauthorized access more difficult. Always test the door’s stability after applying these measures to ensure they are effective and secure.

Safety and Security Tips

Always ensure proper alignment and test the lock’s stability. Regularly lubricate the mechanism for smooth operation. Inspect the door tracks and rollers for damage. Schedule maintenance to maintain security and functionality. These steps enhance safety and prevent potential issues. Regular checks ensure your garage door remains secure and reliable over time. Proper alignment and maintenance are key to effective security. Always address issues promptly to avoid larger problems. Regular care ensures your garage door remains a reliable barrier against unauthorized access and potential threats. Keep your garage door secure with consistent attention.

Ensuring Proper Alignment for Locking

Proper alignment is crucial for effective manual locking. Ensure the garage door is fully closed and evenly aligned with the floor and frame. Misalignment can prevent the lock from engaging securely. Use the manual release cord to disengage the automatic opener and verify the door’s position. Check the tracks and rollers for obstructions or damage, as these can hinder proper alignment. If the door is slightly ajar or uneven, adjust it gently before locking. Proper alignment ensures the lock engages smoothly and provides maximum security. Always test the lock after securing to confirm it holds the door firmly in place.

Testing the Lock for Stability

Testing the lock for stability ensures your garage door remains secure. After manually locking, gently pull the door to check if it holds firm. Verify that the locking mechanism is fully engaged and the door cannot be moved. Inspect the lock’s condition, ensuring no wear or damage that could compromise security. If using auxiliary locks, test them similarly. Regular testing helps identify issues early, preventing potential breaches. For added assurance, perform this check after any adjustments or maintenance. A stable lock guarantees your garage door’s security and provides peace of mind. Always ensure the door is properly aligned before testing.

Maintaining Garage Door Security

Maintaining garage door security involves regular inspections and proactive measures. Check the locking mechanism for wear and tear, ensuring all components function smoothly. Lubricate moving parts to prevent rust and ensure smooth operation. Inspect door tracks and rollers for alignment and damage, addressing issues promptly. Keep the area around the door clear of obstructions to avoid interference. Regularly test the lock’s stability and adjust as needed. Consider scheduling professional maintenance annually to identify and fix potential vulnerabilities. By staying vigilant, you can uphold your garage door’s security and protect your property effectively. Consistent upkeep ensures long-term reliability and safety.

Troubleshooting Common Issues

Common issues include locks not engaging or doors sticking. Check alignment, ensure proper lubrication, and inspect for obstructions. Adjust mechanisms if necessary to restore smooth operation.

When the Manual Lock Doesn’t Engage

If the manual lock fails to engage, check for misalignment or debris obstructing the mechanism. Ensure the door is fully closed and properly aligned with the lock. Clean the locking assembly and lubricate moving parts if necessary. If the issue persists, inspect for worn or damaged components and replace them. Use a C-clamp or pliers to temporarily secure the door if the lock cannot be engaged. Always verify that the door tracks and rollers are clear of obstructions before attempting to lock. If problems recur, consider adjusting the lock’s alignment or consulting a professional for assistance.

Adjusting the Locking Mechanism

To adjust the locking mechanism, loosen the securing bolts to allow repositioning. Align the striker plate or catch with the lock bar, ensuring proper engagement. Tighten the bolts firmly and lubricate moving parts for smooth operation. Regular adjustments prevent wear and tear, ensuring the door remains securely locked. Proper alignment is crucial for maintaining security and functionality over time. By following these steps, you can keep your garage door locking system in optimal condition.

Dealing with a Stuck Garage Door

If your garage door is stuck while manually locking, avoid forcing it to prevent damage. Check for obstructions in the tracks or rollers and remove any debris. Ensure the door is properly aligned with the locking mechanism. Lubricate hinges and rollers to reduce friction. Use a rubber mallet to gently tap the door back into alignment if necessary. Apply silicone-based lubricant to moving parts for smoother operation. If the door remains stuck, consider using clamps or additional locks to secure it temporarily. Always approach the issue methodically to avoid further damage and ensure the door can be locked securely once unstuck.

Maintenance and Care

Regularly lubricate the locking mechanism and inspect door tracks and rollers for wear. Schedule routine maintenance to ensure smooth operation and prevent potential security vulnerabilities over time.

Lubricating the Locking Mechanism

Regular lubrication of the locking mechanism ensures smooth operation and prevents rust or corrosion. Use a silicone-based spray or oil to lightly coat moving parts. Avoid grease, as it attracts dirt. Clean the mechanism first with a cloth to remove grime. Apply lubricant to hinges, springs, and the lock’s internal components. This maintenance step prevents jamming and ensures the lock engages securely. Lubricate every 6-12 months, depending on usage and environmental conditions. Proper care extends the lifespan of the locking system, maintaining your garage door’s security and functionality over time.

Inspecting the Door Tracks and Rollers

Regular inspection of the door tracks and rollers is essential for maintaining smooth operation. Use a flashlight to check for debris, dents, or misalignment. Clean tracks with a cloth to remove dirt and grime. Lubricate rollers with silicone spray to reduce friction. Look for signs of wear, such as uneven gaps or rust, and tighten loose bolts. If rollers are damaged or worn, replace them promptly. Properly aligned and maintained tracks ensure the door moves securely, preventing gaps or jams that could compromise manual locking. Regular checks help maintain functionality and prevent potential security risks over time. Always ensure tracks are clear and rollers are in good condition for optimal performance.

Scheduling Regular Maintenance

Regular maintenance is crucial for ensuring the longevity and security of your garage door locking system. Schedule inspections every 3-6 months to check for wear and tear. Lubricate hinges, rollers, and springs to maintain smooth operation. Inspect tracks for alignment and cleanliness, and tighten any loose bolts. Replace worn-out parts promptly to avoid compromising security. Test the door’s balance by manually opening it halfway to ensure it stays in place. A well-maintained system reduces the risk of mechanical failures and enhances overall safety. Consistent upkeep ensures your manual locking mechanism remains reliable and secure over time.

Manually locking your garage door enhances security and peace of mind. By following key steps and maintaining your system, you ensure reliable protection and long-term functionality. Always double-check your locks and consider additional safety measures for maximum security.

To manually lock your garage door, start by disconnecting the automatic opener to ensure the door operates independently. Locate the manual locking mechanism, typically found near the door tracks or handle. Engage the lock by sliding or turning it into place, ensuring it aligns properly with the door’s frame. For added security, use auxiliary devices like padlocks or C-clamps to reinforce the lock. Test the stability of the door by attempting to pull or push it gently. Finally, secure any additional measures, such as padlocking the track, to prevent unauthorized access. Regularly inspect and maintain the locking system for optimal functionality.

Final Tips for Garage Door Security

For enhanced garage door security, consider installing padlocks on the track or using a C-clamp to prevent unauthorized access. Regularly inspect the door tracks and rollers for wear and tear, ensuring smooth operation. Lubricate moving parts annually to maintain functionality. Keep the garage area well-lit to deter intruders and store valuable items out of sight. Always test the manual lock after engaging it to ensure stability. For added protection, use a security bar or sliding lock to reinforce the door. Remember to check the alignment of the door before locking to ensure a secure seal. These steps ensure long-term safety and reliability.

rai italia australia tv guide

Overview of Rai Italia Australia TV Guide

Rai Italia Australia TV Guide offers a comprehensive lineup of Italian programming, including popular series, live news, and sports events, catering to Italian expatriates and language learners.

Rai Italia Australia is a dedicated Italian television service designed for Italian expatriates and language learners in Australia. It provides a diverse range of programming, including entertainment, news, sports, and cultural content. The service aims to connect viewers with Italian heritage and culture through high-quality broadcasts. Available through various platforms, Rai Italia Australia ensures access to Italian TV for audiences across the country. Its programming includes popular series, live news updates, and sports events, making it a vital source of Italian media in Australia. Viewers can enjoy a mix of traditional and modern content, tailored to maintain a strong cultural connection.

Key Features of the TV Guide

The Rai Italia Australia TV Guide offers a detailed and organized schedule of Italian programming tailored for Australian audiences. It features daily and weekly listings, highlighting popular series, live news broadcasts, and sports events. Viewers can access information on upcoming episodes of shows like Il Paradiso delle Signore and Punti di Vista. The guide also includes live sports coverage, such as cycling events like the Giro d’Italia, and entertainment programs like Agorà Weekend. Additionally, it provides updates on program extensions, delays, and broadcast rights, ensuring viewers stay informed about schedule changes. The TV guide is available both online and through traditional listings, making it accessible to a wide audience. Its user-friendly format allows viewers to plan their viewing experience effortlessly, catering to both Italian expatriates and language learners alike.

TV Schedule Highlights

Rai Italia Australia TV Guide showcases a mix of popular Italian series, live news, and exciting sports events, offering diverse entertainment for viewers.

Daily Programming Schedule

Rai Italia Australia’s daily programming schedule begins early in the morning, often starting with news updates like Rai News 24 and followed by popular series such as Il Paradiso delle Signore. Mid-morning slots feature lifestyle shows, including Punti di Vista and Seempre Mezzogiorno, which focus on current affairs and cultural topics. Afternoons are filled with entertainment programs like Affari Tuoi and Paparazzi, offering a mix of game shows and celebrity news. Prime-time evening schedules highlight Italian dramas and live sports events, such as cycling races like the Giro d’Italia. The lineup is designed to cater to diverse viewer preferences, ensuring a balanced mix of information, entertainment, and culture throughout the day.

Weekly Specials and Events

Rai Italia Australia’s weekly specials and events offer a diverse range of programming tailored to captivate audiences. From live broadcasts of major Italian sports events, such as the Giro d’Italia, to exclusive cultural programs, viewers can enjoy unique content. Weekly highlights often include marathons of popular series like Il Paradiso delle Signore and special broadcasts of Italian documentaries. Additionally, the network features themed weekends, focusing on Italian cinema, music, and regional festivals. These weekly specials provide a deeper connection to Italian culture, making them a must-watch for both expatriates and language learners. The lineup is regularly updated to ensure fresh and engaging content for all audiences.

Popular Shows on Rai Italia Australia

Rai Italia Australia features a variety of popular shows, including Italian dramas, comedies, and lifestyle programs; Highlights include Il Paradiso delle Signore, Punti di Vista, and Cartoni Animati, offering entertainment for all audiences.

Top-Rated Italian Series

Rai Italia Australia broadcasts a selection of top-rated Italian series that captivate audiences with compelling storylines and rich cultural insights. Il Paradiso delle Signore stands out as a fan favorite, offering a blend of drama and historical context. Other popular series include Punti di Vista, which explores diverse perspectives on Italian lifestyle and culture. These programs are carefully curated to provide viewers with a deep connection to Italy’s heritage, making them a cornerstone of Rai Italia’s programming. The series often feature high production quality and engaging narratives, ensuring a memorable viewing experience for both Italian expatriates and global audiences.

Live News and Current Affairs

Rai Italia Australia provides comprehensive live news and current affairs programming, ensuring viewers stay informed about events in Italy and around the world. Rai News 24 offers real-time updates in Italian, while Rai News 24 ⎻ English caters to international audiences. The channel also features TG1, a leading Italian news program, delivering in-depth coverage of national and global affairs. These broadcasts are complemented by analytical shows like Punti di Vista, which explore diverse perspectives on current events. With a focus on accuracy and timeliness, Rai Italia’s news programming serves as a vital connection for viewers seeking reliable information and insights into Italian and international news.

Sports Coverage on Rai Italia Australia

Rai Italia Australia offers extensive sports coverage, including live events like Giro d’Italia and other cycling races, ensuring fans stay connected to Italian sports culture and competitions.

Live Sports Events

Rai Italia Australia broadcasts live sports events, including the Giro d’Italia, offering fans in Australia a chance to watch major Italian sporting events. The network covers cycling races, football matches, and motorsports, ensuring viewers stay connected to Italy’s vibrant sports culture. With real-time commentary and analysis, these events bring the excitement of Italian sports directly to Australian audiences. The live broadcasts are a key feature of the TV guide, catering to die-hard sports fans and casual viewers alike. Rai Italia Australia ensures that sports enthusiasts never miss out on the action, delivering high-quality coverage of Italy’s most thrilling competitions.

Sports Highlights and Repeats

Rai Italia Australia provides extensive sports highlights and repeats, allowing viewers to catch up on missed events. The platform features reruns of popular sports programs, including Il Paradiso delle Signore and Rai News 24, ensuring fans don’t miss key moments; Football matches, cycling races, and motorsports are often replayed, giving audiences flexibility. Additionally, the TV guide includes delayed broadcasts of major events like the Giro d’Italia, making it accessible to viewers who prefer watching at convenient times. These repeats are available on both traditional TV and streaming platforms, offering a flexible viewing experience for sports enthusiasts in Australia.

How to Access Rai Italia Australia TV Guide

Access Rai Italia Australia TV Guide through online streaming platforms or traditional TV listings. View live channels, schedules, and programs via streaming services or official provider websites.

Online Streaming Options

Viewers can access Rai Italia Australia through online streaming services like Il Globo TV, offering over ten live Italian channels. This platform provides
convenience for watching popular shows, live news, and sports events. Streaming options also include official Rai Italia Australia websites and apps,
featuring schedules and program listings. Users can enjoy live and on-demand content, ensuring they never miss their favorite Italian programs. Additionally,
streaming services are accessible on various devices, including smartphones, tablets, and smart TVs. Some services may require a subscription or payment for
premium content. For the most accurate and updated streaming information, visit the official Rai Italia Australia website or authorized streaming providers.

Traditional TV Listings

Traditional TV listings for Rai Italia Australia are available through various platforms, ensuring viewers can plan their viewing schedule in advance. The official Rai Italia
website provides detailed daily and weekly schedules, including program titles, air times, and brief descriptions. Additionally, many local TV guide
websites and third-party apps offer Rai Italia Australia listings, making it easy to stay updated. Some cable and satellite providers also include Rai
Italia Australia in their electronic program guides (EPGs), allowing users to browse and set reminders for their favorite shows. For those who prefer
print media, some Italian community newspapers and magazines in Australia publish weekly TV schedules. These traditional listings are reliable sources for
tracking live news, sports, and entertainment programs on Rai Italia Australia.

Additional Features and Information

The Rai Italia Australia TV Guide provides updates on program extensions, delays, and broadcast rights, ensuring viewers stay informed about scheduling changes and availability.

Program Extensions and Delays

Rai Italia Australia TV Guide provides real-time updates on program extensions and delays, ensuring viewers are informed about any scheduling changes. The platform offers notifications for extended episodes or postponed broadcasts, allowing audiences to adjust their viewing plans accordingly. Additionally, the guide highlights any unforeseen interruptions or rescheduling of popular shows or live events, such as sports matches or special broadcasts. Viewers can also access detailed explanations for delays, often caused by technical issues or overlapping events. This feature ensures a seamless viewing experience, keeping fans engaged and up-to-date with their favorite programs. Regular updates are available on the official website and through the Rai Italia Australia app, making it easy to track changes. This transparency is crucial for maintaining viewer satisfaction and loyalty to the channel.

Broadcast Rights and Availability

Rai Italia Australia holds exclusive broadcast rights for a wide range of Italian programs, ensuring high-quality content availability for viewers in Australia. The channel is accessible through various platforms, including traditional TV and online streaming services like Il Globo TV, which offers live channel streaming. Availability is tailored to cater to Italian expatriates and enthusiasts of Italian culture, with programming broadcast in both Italian and English where applicable. Regional restrictions may apply, but Rai Italia Australia works closely with local providers to ensure maximum reach and accessibility. The network also offers delayed broadcasts for select programs, allowing viewers flexibility in their viewing schedules. This ensures that fans of Italian television can enjoy their favorite shows without missing out due to time zone differences or scheduling conflicts.

convert from manual to automatic transmission

Converting a manual transmission to an automatic offers convenience, especially in heavy traffic, but involves significant modifications and costs. Ensure compatibility and budget accordingly.

Overview of Manual to Automatic Transmission Conversion

Converting a manual transmission to an automatic is a complex process that involves significant modifications. It requires replacing the manual gearbox with an automatic transmission, adapting the drivetrain, and updating the vehicle’s electronics. Compatibility between the engine and the new transmission is crucial. While the process can enhance driving convenience, it also demands careful planning and professional expertise. The goal is to ensure smooth integration and optimal performance, making the vehicle more suitable for modern driving demands and preferences.

Feasibility and Compatibility

Converting a manual to automatic is feasible but requires thorough compatibility checks. Ensure the vehicle’s engine and drivetrain can support the automatic transmission and necessary modifications.

Checking Vehicle Specifics

Before conversion, evaluate your vehicle’s engine compatibility, drivetrain, and ECU system. Ensure the automatic transmission and components like the flex plate and mounts are suitable. Modern cars post-1990s require advanced modifications, including new wiring harnesses and electronics. Compatibility varies by make and model, so thorough research or professional consultation is essential to avoid costly errors.

Cost Considerations

Converting a manual to an automatic transmission can range from $250 to $2,500, depending on the vehicle and components needed, such as a new ECU and wiring harness.

Estimated Expenses

The cost to convert a manual to an automatic transmission can range from $250 to $2,500, depending on the vehicle and components needed. A refurbished or new automatic transmission is the primary expense, with labor costs adding significantly. Additional expenses may include a new ECU, wiring harness, and potential drivetrain modifications. Budget extra for motor mounts, transmission mounts, and any custom work required for compatibility.

Conversion Process

The conversion process involves removing the manual transmission, installing an automatic one, and adapting necessary components like the ECU and wiring harness for compatibility.

Steps Involved

Converting from manual to automatic involves several key steps. First, remove the manual transmission and replace it with an automatic unit. Next, install a new flywheel or flex plate to ensure proper connection. The clutch pedal assembly must be removed and replaced with automatic-specific components. Additionally, the ECU and wiring harness need upgrading to support automatic transmission functionality. Finally, the shifter mechanism is modified to accommodate the automatic gear selector, ensuring smooth operation.

Professional Assistance

Converting a manual to an automatic transmission often requires professional expertise due to the complexity of the process. A skilled mechanic or transmission specialist ensures proper installation and compatibility. They handle critical tasks like wiring harness modifications, ECU reprogramming, and custom fabrication if needed. DIY attempts can lead to costly errors, making professional assistance highly recommended for a smooth and reliable conversion.

Benefits and Drawbacks

Converting to automatic offers convenience and ease, ideal for heavy traffic. However, it can be costly and complex, requiring significant modifications and expertise.

Advantages of Automatic Transmission

Automatic transmissions offer enhanced convenience, especially in heavy traffic, reducing driver fatigue. They provide smoother acceleration and easier handling, particularly in hilly or stop-and-go conditions. New drivers benefit from the simplicity of operation, allowing focus on road awareness. Additionally, automatics often include features like cruise control and seamless gear shifts, improving overall driving comfort and efficiency. This makes them ideal for urban environments and long-distance commuting.

Disadvantages

Converting to automatic involves high costs due to extensive modifications. The process requires new components like ECUs, wiring harnesses, and mounts. Fuel efficiency may decrease with automatics, and driver engagement is reduced. Modern manuals often achieve better performance and lower maintenance costs. Additionally, the complexity of the conversion can lead to potential reliability issues if not executed properly by skilled professionals, making it a less practical choice for some drivers.

Maintenance and Longevity

Regular maintenance is crucial for automatic transmissions, including fluid changes and filter replacements. Proper installation ensures longevity, while poor execution can lead to premature wear and repairs.

Post-Conversion Maintenance

Regular maintenance is essential after converting to an automatic transmission. Ensure fluid levels are checked and changed as recommended. Inspect the transmission pan and coolant lines for leaks. Filters should be replaced periodically to prevent contamination. Additionally, monitor the torque converter and solenoid pack for proper function. Addressing minor issues early can prevent major repairs. Proper care extends the lifespan of the automatic transmission and ensures smooth operation over time.

Parts Availability

Converting a manual to an automatic requires sourcing specific parts, including a new ECU, wiring harness, transmission mount, and motor mount. Compatibility is key.

Sourcing Components

Converting a manual to an automatic requires several key components, including a new ECU, wiring harness, transmission mount, and motor mount. These parts ensure compatibility and proper installation. Custom fabrication may be necessary for some vehicles, increasing costs. Prices can range from $250 to $2500, depending on the car and transmission type. It’s crucial to source high-quality parts from reputable suppliers to ensure reliability and performance.

Community Resources

Online forums, social media groups, and specialized automotive communities offer valuable insights and support for manual-to-automatic conversions. Platforms like Reddit and Facebook host dedicated groups where enthusiasts share experiences and advice. Local car clubs and workshops often provide hands-on guidance and access to skilled mechanics. Additionally, online tutorials and YouTube channels detail step-by-step processes, helping DIYers navigate complex modifications. Engaging with these resources can simplify the conversion process and reduce potential pitfalls.

Legal and Regulatory Considerations

Ensuring compliance with local laws and regulations is crucial when converting a manual to automatic transmission. Inspections and documentation may be required to validate the modification legally.

Compliance Requirements

Converting a manual to automatic transmission requires adherence to local regulations. Modifications must meet safety and emissions standards. Inspection certifications and updated vehicle documentation are typically necessary. Penalties may apply for non-compliance, emphasizing the importance of legal validation. Additionally, ensuring all electronic systems align with the new transmission is crucial for proper functionality and regulatory approval.

Resale Value Impact

Converting to automatic may boost resale value in regions where automatics are preferred, but in markets favoring manuals, it could reduce appeal and resale price.

Market Considerations

Resale value impact varies by market. In regions favoring automatics, conversion may enhance appeal and value. However, in areas where manuals are preferred, especially among enthusiasts, resale value could decrease. Researching local market trends and buyer preferences is crucial. Automatic transmissions are often sought after for convenience, but manual enthusiasts may view conversions negatively. Balancing supply and demand dynamics is key to maximizing resale potential. Understanding regional preferences helps make informed decisions.

Driving Habits and Needs

Consider traffic conditions, daily commuting demands, and personal preference. Automatic transmissions suit heavy traffic and ease of use, while manuals offer control for enthusiasts and specific driving scenarios.

Evaluating Typical Driving Conditions

Evaluate your typical driving environment to decide if an automatic transmission suits your needs. Heavy traffic, frequent stops, and urban commuting benefit from automatics, reducing driver fatigue. For hilly or rural areas, manuals may offer better control. Consider personal preference, such as ease of use or the thrill of manual driving. Assessing these factors helps determine if the conversion aligns with your lifestyle and daily commuting requirements.

Technical Considerations

Converting a manual to automatic requires compatible engine and transmission. Modifications include new ECU, wiring harness, mounts, and firewall adjustments. A complex process.

Engine and Transmission Compatibility

Ensuring engine and transmission compatibility is crucial. Modern engines require specific ECU configurations and wiring harnesses for automatic transmissions. The drivetrain must be compatible, potentially needing custom adapters or bellhousing modifications. Incorrect installation can lead to mechanical failure or safety hazards. Professional expertise is often necessary to align components properly. Compatibility issues can complicate the process significantly, making it essential to verify specifications before starting the conversion.

Converting a manual to an automatic transmission is feasible but complex, requiring careful consideration of compatibility, cost, and professional expertise to ensure a successful outcome.

Final Decision

Converting a manual to an automatic transmission is a complex decision that hinges on personal needs, budget, and vehicle compatibility. Weigh the benefits of convenience against the high costs and technical challenges. Modern vehicles may require extensive modifications, including new electronics and drivetrain adjustments. Professional expertise is often essential for a successful conversion. Ultimately, the decision should be based on thorough research, financial capacity, and long-term practicality to ensure the outcome aligns with your expectations and driving requirements.

bicentennial national trail map pdf

Overview of the Bicentennial National Trail

The Bicentennial National Trail spans 5,330 km, linking bush, wilderness, and mountains across Australia, established in 1988 as a non-motorized, multi-use route with detailed maps available.

The Bicentennial National Trail (BNT) is Australia’s longest marked, non-motorized, self-reliant multi-use trekking route, spanning an impressive 5,330 kilometers. Established in 1988, it was created to celebrate Australia’s bicentenary, offering a unique way to explore the country’s diverse landscapes. The trail winds through bushlands, wilderness areas, and mountain regions, providing a challenging yet rewarding experience for hikers, horseback riders, and cyclists. Detailed maps, such as Book 6 Map 3 and Section 4 Map 7, are essential for navigation, showcasing segments like Maria Creek to Cressbrook Creek and the Dawson Highway portion. These resources help users plan and traverse the trail’s remote and scenic pathways.

1.2 Historical Significance and Establishment

The Bicentennial National Trail (BNT) was established in 1988 to commemorate Australia’s bicentenary, marking 200 years since European settlement. It stands as a testament to the country’s rich history and diverse landscapes. Stretching 5,330 kilometers, the trail is the longest non-motorized, self-reliant multi-use route in the world, designed to connect bushlands, wilderness, and mountainous regions. Its creation aimed to promote outdoor recreation, conservation, and cultural awareness. Detailed maps, such as Book 6 Map 3 and Section 4 Map 7, have been developed to guide users through its vast and scenic pathways. The trail’s establishment reflects Australia’s commitment to preserving its natural and historical heritage for future generations.

Key Sections and Maps of the Bicentennial National Trail

The Bicentennial National Trail spans diverse landscapes, with key sections like Book 6 Map 3 and Section 4 Map 7 providing detailed route guidance for adventurers.

2.1 Section 4 Map 7: Dawson Highway Segment

Section 4 Map 7 highlights the Dawson Highway segment, where the Bicentennial National Trail runs parallel to the highway for approximately 8 kilometers. This section is marked on the map, offering a unique blend of rural and natural landscapes. The trail navigates through mixed terrain, including forests, grasslands, and roadside tracks, providing a diverse experience for hikers and horseback riders.

The map details the trail’s route, ensuring clear navigation through this segment. It also indicates key landmarks and potential access points, making it an essential resource for adventurers. This section is moderately challenging, with varied surfaces that require attention and preparation.

2.2 Book 6 Map 12: Mt Sylvia to Lefthand Branch Camp

Book 6 Map 12 covers the 19.3 km segment from Mt Sylvia to Lefthand Branch Camp, featuring a 30m descent. This section offers a mix of forested and open landscapes, with the trail winding through diverse terrain. The map provides detailed contours and markings, essential for navigation. It highlights campsites, water sources, and trail intersections, making it a crucial resource for hikers and horseback riders. The route is moderately challenging, with uneven surfaces and occasional steep sections. The map’s scale of 1:75,000 ensures clarity, helping adventurers plan their journey through this scenic part of the Bicentennial National Trail.

2.3 Book 6 Map 3: Maria Creek to Cressbrook Creek

Book 6 Map 3 details the 25.5 km section from Maria Creek to Cressbrook Creek, with a scale of 1:75,000. This part of the Bicentennial National Trail is known for its diverse terrain, including dense forests and open grasslands. The map highlights key landmarks, water crossings, and campsites, such as Myrtle Grove, now known as Widden Stud Campsite. Contour lines at 10m intervals provide elevation insights, aiding in route planning. The trail is moderately challenging, with some steep sections and uneven pathways. This map is essential for navigating the remote areas between Maria Creek and Cressbrook Creek, ensuring a safe and enjoyable journey through this scenic stretch of the trail.

Challenges and Features of the Trail

The Bicentennial National Trail offers diverse challenges, including rugged terrain and remote sections, while featuring scenic bushlands, mountains, and wilderness areas for immersive outdoor experiences.

3.1 Terrain and Difficulty Levels

The Bicentennial National Trail features diverse and challenging terrain, including rugged bushlands, steep mountain climbs, and remote wilderness areas. The trail is designed for experienced adventurers, with difficulty levels varying from moderate to extreme. Certain sections require navigating rocky paths, river crossings, and uneven ground, while others offer scenic descents and ascents through forests and open plains. The trail’s multi-use nature accommodates hikers, horseback riders, and cyclists, though some parts are more suited to specific activities due to terrain conditions. Detailed maps, such as Book 6 Map 3 and Section 4 Map 7, provide insights into elevation changes and trail conditions, helping users prepare for the challenges ahead.

3.2 Camping and Facilities Along the Trail

Camping facilities along the Bicentennial National Trail vary, offering basic to well-equipped sites. Many sections provide designated campsites with water sources and picnic tables, while others require self-reliant camping. Book 6 Map 12 highlights campsites like Mt Sylvia and Lefthand Branch Camp, offering primitive amenities. Widden Stud Campsite, formerly Myrtle Grove, requires advance booking. Facilities are spaced intermittently, emphasizing the need for self-sufficiency. Detailed maps, such as Section 4 Map 7, guide users to accessible campsites and water points. Campers must adhere to environmental guidelines to preserve the trail’s natural beauty. Updated trail guides ensure users have the latest information on available facilities and access points.

Environmental and Cultural Impact

The Bicentennial National Trail, established in 1988, spans 5,330 km, promoting conservation and cultural awareness while connecting diverse Australian landscapes and Indigenous heritage sites sustainably.

4.1 Conservation Efforts and Wilderness Areas

The Bicentennial National Trail plays a significant role in promoting conservation across Australia’s diverse landscapes. Established in 1988, the 5,330 km trail spans bush, wilderness, and mountainous regions, often passing through protected areas. Conservation efforts are integrated into trail management, with maps like Book 6 Map 3 highlighting sensitive ecosystems near Maria Creek to Cressbrook Creek. These areas are crucial for preserving native flora and fauna. The trail’s route through wilderness zones supports biodiversity and sustainable tourism, encouraging hikers to respect and protect the environment. Regular updates to trail maps ensure that conservation priorities are maintained, balancing recreational use with ecological preservation. This balance is essential for the trail’s long-term sustainability.

4.2 Indigenous Cultural Significance

The Bicentennial National Trail traverses landscapes rich in Indigenous cultural heritage, with many sections passing through areas of deep spiritual significance. The trail acknowledges and respects the traditional lands of Australia’s First Nations peoples. Maps like Book 6 Map 3 and Book 6 Map 12 highlight regions where Indigenous cultural sites are preserved. These areas include ancient trails, ceremonial grounds, and sacred water sources. The trail’s route often aligns with historical pathways used by Indigenous communities, offering a connection to their enduring legacy. Efforts are made to protect these sites, ensuring their cultural integrity for future generations. The trail serves as a bridge between modern exploration and ancient traditions.

Navigation and Resources

The Bicentennial National Trail is supported by detailed maps and GPS tracking, ensuring accurate navigation through diverse terrains. Official trail guides provide essential updates and route information.

5.1 GPS Tracking and Digital Maps

The Bicentennial National Trail is well-supported by GPS tracking and digital maps, offering precise navigation through its 5,330 km route. Detailed maps, such as Book 6 Map 3 and Section 4 Map 7, provide scales of 1:75,000 with 10m contours, ensuring accuracy. Digital versions allow real-time tracking, essential for remote sections. GPS data is regularly updated to reflect trail changes, aiding users in planning and executing their journeys. These resources are indispensable for adventurers, ensuring safe and efficient travel across diverse terrains.

5.2 Updated Trail Guides and Documentation

The Bicentennial National Trail is supported by comprehensive trail guides and documentation, ensuring users have access to the most current information. Detailed maps, such as Book 6 Map 3 and Section 4 Map 7, provide precise details of trail segments, including distances, terrain, and facilities. These resources are regularly updated to reflect changes in trail conditions, access points, and campsite availability. Trail guides are available in PDF formats, making them easily accessible for planning and navigation. Users are encouraged to check the latest versions before embarking on their journey to ensure accurate and safe travel along the trail.

Future Developments and Maintenance

The Bicentennial National Trail undergoes continuous updates to ensure safety and accessibility, with long-term plans documented, including the northern route expansion from September 2009 maps.

6.1 Long-Term Plans for the Northern Route

The Bicentennial National Trail’s northern route is set for strategic expansion, with detailed plans outlined in September 2009 maps. These plans aim to enhance trail connectivity, improving access for hikers and horseback riders while preserving natural landscapes. Environmental assessments ensure sustainable development, balancing recreation with conservation. Future updates will incorporate feedback from local communities and authorities to maintain the trail’s integrity and appeal. The northern route’s long-term vision includes upgrading infrastructure and clarifying boundaries to accommodate diverse user needs. These efforts ensure the trail remains a premier destination for outdoor enthusiasts, aligning with its original purpose as a non-motorized, multi-use route.

6.2 Ongoing Trail Maintenance and Access Updates

The Bicentennial National Trail undergoes continuous maintenance to ensure safe and accessible passage for users. Regular updates include track clearing, campsite improvements, and signposting enhancements. Access points are periodically reviewed and modified to accommodate changing land use and environmental conditions. Trail managers collaborate with local authorities and conservation groups to address erosion and habitat protection. Users are advised to consult updated trail guides and PDF maps for the latest information on access restrictions or route changes. These efforts ensure the trail remains navigable while preserving its natural and cultural heritage for future generations. Ongoing feedback from hikers and horseback riders helps refine maintenance priorities and improve overall trail conditions.